Table of Contents
There is a specific, dense gravity to a Nikon F2. When you pick it up, it does not feel or look like a consumer electronic device. Being of an era before the Giugiaro-designed F3, the F2 was the professional camera from Nikon’s professional era. The design is boxy and utilitarian, the finder prism looking like a large box on the top of the camera. Personally, I get the feel of space equipment. Fitting then that it was used in the Skylab space missions.
Construction-wise, the F2 is aluminium wrapped in heavy brass top and bottom plates. It is designed to comfortably outlive you, pull on that film crank and you will know exactly what I mean. It feels different from consumer cameras. It feels professional.
The F2 was the last Nikon F-body to be mechanical; hence it requires no battery to function at all shutter speeds. The F2 has no fancy aperture priority, no autofocus (apart from with a specific finder). The batteries are only used for the meter that lives inside the prism.
Despite looking like space equipment, you don’t need to be NASA qualified to use the F2. Everything may be manual, but it was designed for the photographer. Here is how to navigate, master, and shoot the legendary Nikon F2.
The Anatomy of a Legend: Prisms, Screens, and Glass
Before we load a roll of film, we must address the sheer modularity of the F2. The F2 was a system. Understanding your specific setup is important for lens selection and how to use the camera.
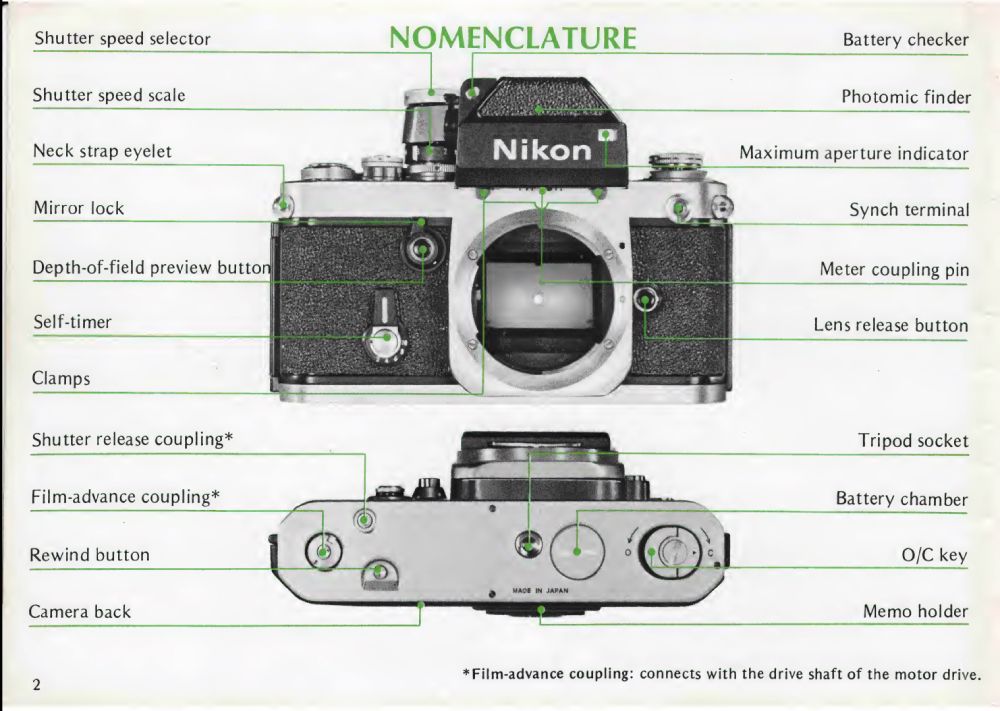
The Photomic Finders (The Prisms)
The name of your F2 is dictated by the prism finder attached to it. There are two main groups of F2 finders, those which were made to work with Nikon’s non-AI lenses and those made to work with AI and later lenses.
- The DP-1 (F2 Photomic): The original standard. It uses a CdS cell and a classic needle-match metering system. To use it, you will need to manually “index” the lens every time you mount it by twisting the aperture ring all the way back and forth (the famous “Nikon Shuffle”) so the meter physically learns the maximum aperture.
- The DP-2 (F2S) & DP-3 (F2SB): These brilliant finders swapped the delicate needle for LED readouts, making them infinitely better for low-light shooting. The DP-3, in particular, introduced Silicon Photo Diodes (SPD) which react instantly to light changes. Both still require the mechanical “Nikon Shuffle” to index the lens.
- The DP-11 (F2A): This is where things modernised. The DP-11 introduced Automatic Maximum Aperture Indexing (AI). You no longer have to do the aperture twist; the finder automatically reads a physical ridge milled into the back of an AI lens. It reverted to a needle display.
- The DP-12 (F2AS): The ultimate, most fiercely sought-after finder. It features AI coupling alongside a ridiculously sensitive, ultra-fast SPD LED metering system.
The Glass: Lens Compatibility
Because of those modular finders, you must pay attention to what glass you are mounting:
- If you have an early finder (DP-1, DP-2, DP-3), you must use “Pre-AI” (Non-AI) lenses with the metal “rabbit ears” screwed onto the aperture ring. These ears physically grab the coupling pin on the front of the finder.
- If you have an AI finder (DP-11, DP-12), you need AI or AI-S lenses. The finder reads the milled ridge on the rear of the aperture ring. (A clever trick: you can flip the small AI coupling tab up and out of the way on an F2A/F2AS to mount older Pre-AI glass, but you will have to use stop-down metering to get a reading).
Focusing Screens
Nikon offered over twenty different focusing screens for the F2. Here are the most common:
- Type K: The most common and versatile. It features a central split-image rangefinder surrounded by a shimmering micro-prism collar.
- Type A: A classic split-image centre, ideal for general photography and architecture where straight horizontal or vertical lines are prevalent.
- Type E: Features a matte field with a grid overlay. If you are shooting landscapes or buildings and absolutely must keep your horizons perfectly level, this is an utter necessity.
General Operation
Shooting an F2 is a deeply tactile process. Let us walk through the steps.
1. Loading the Film
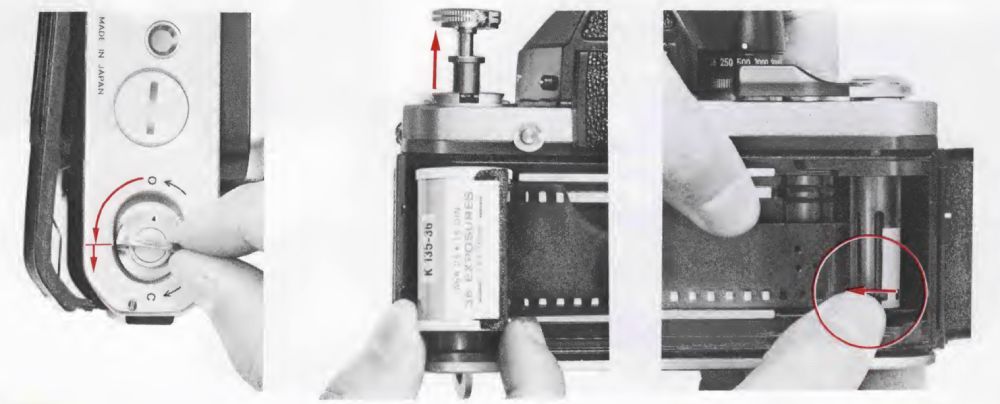
Loading the film is pretty normal, but you need to remember to open the rear door from the bottom plate. Flip out the tab and rotate until the door springs open.
- Lift the tab on the bottom plate and rotate to open the rear door.
- Pull up on the film rewind crank (the knurled knob on the far left of the top plate). (removing the flash connector if installed)
- Drop your 35mm cassette into the left chamber and push the rewind crank firmly back down to lock the cassette in place.
- Pull the film leader across the focal plane and slot the tip deep into one of the vertical slits on the take-up spool on the right.
- Wind on the camera; this should catch the perforations of the film and lock the leader into the spool.
- Close the back firmly. Advance the lever and fire the shutter until the mechanical frame counter reads ‘1’.
2. Setting the ISO
You must tell the mechanical meter what film speed you are using. Lift the textured outer ring surrounding the shutter speed dial and rotate it until the red line matches the ISO (ASA) of your loaded film stock. Drop it back down to lock it in.
3. Metering and Exposure
- Awake the Meter: Pull the film advance lever slightly away from the body. You will feel it click into a standoff position. This physically completes the battery circuit and turns the light meter on.
- Read the Light: Look through the viewfinder.
- If you have a DP-1/DP-11 (Needle): Adjust your aperture ring and shutter speed dial until the black needle sits perfectly dead-centre in the notch.
- If you have a DP-2/DP-3/DP-12 (LED): Adjust your settings until both the
+and-red LEDs illuminate simultaneously, indicating perfect exposure.
- Fire: Depress the shutter. You will feel the violent, mechanical snap of the quilted titanium foil shutter curtains tearing across the focal plane. It is a noise and a vibration that commands respect.
Note that on some finders you can see the meter reading not only through the viewfinder but also on the top of the prism, letting you adjust settings before you raise the camera to your eye.
Advanced
Removing the finder prism
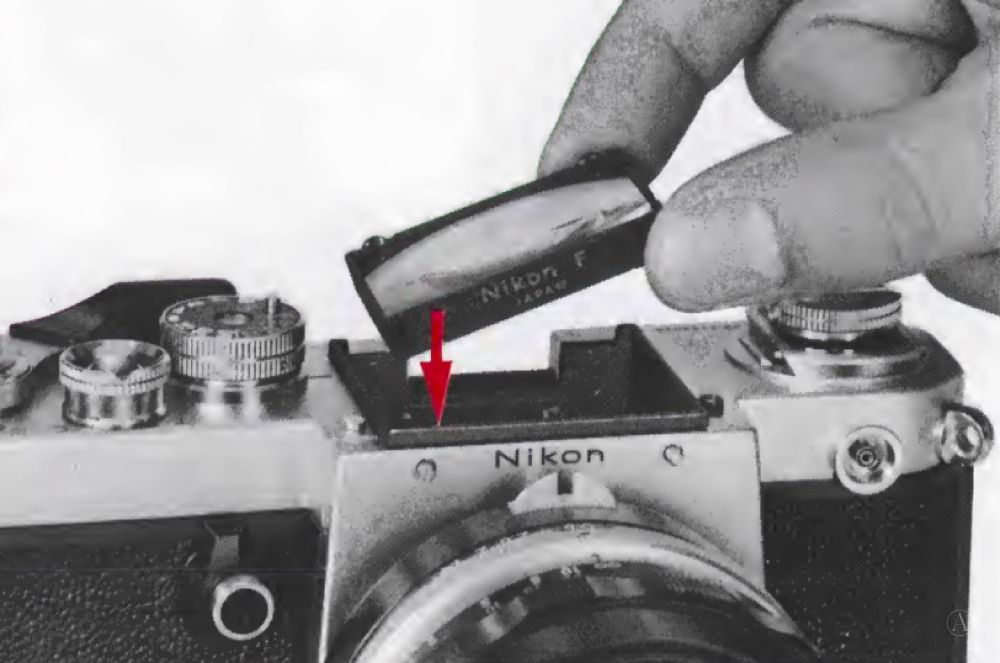
Removing the finder from the top of the camera is a three-step process, and can feel a bit tricky the first time.
- On the rear of the camera to the left of the viewfinder, there is a little silver pusher with a cutout for your fingernail. Press this button in. On my unit, it’s quite tough so I used a highly technical pusher tool.
- On the right of the prism unit towards the front there is a lever. The lever has a locking function, so you need to press the lever in and then push down in one motion.
- Lift the finder prism vertically up and off the camera.
Reinstalling the prism is as simple as aligning and pushing down, then rotating the shutter speed dial both ways to re-engage.
Hidden Features
The F2 hides a suite of professional, purely mechanical tricks beneath its brutalist exterior.
- Depth of Field Preview: Press the silver button located on the front right of the camera body (near the lens mount).
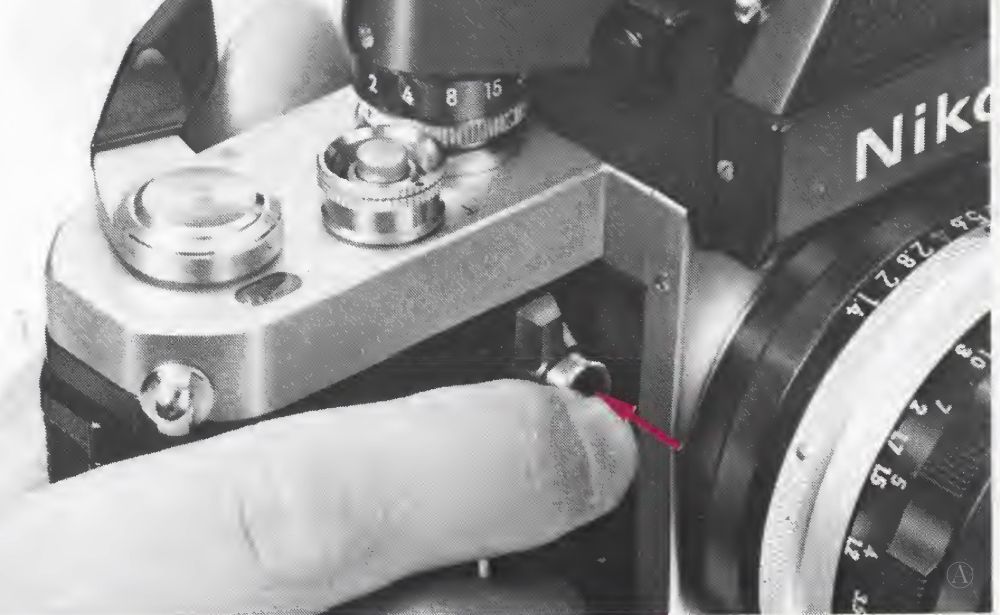
- Mirror Lock-Up: Push the small lever wrapped around the depth-of-field button downwards.
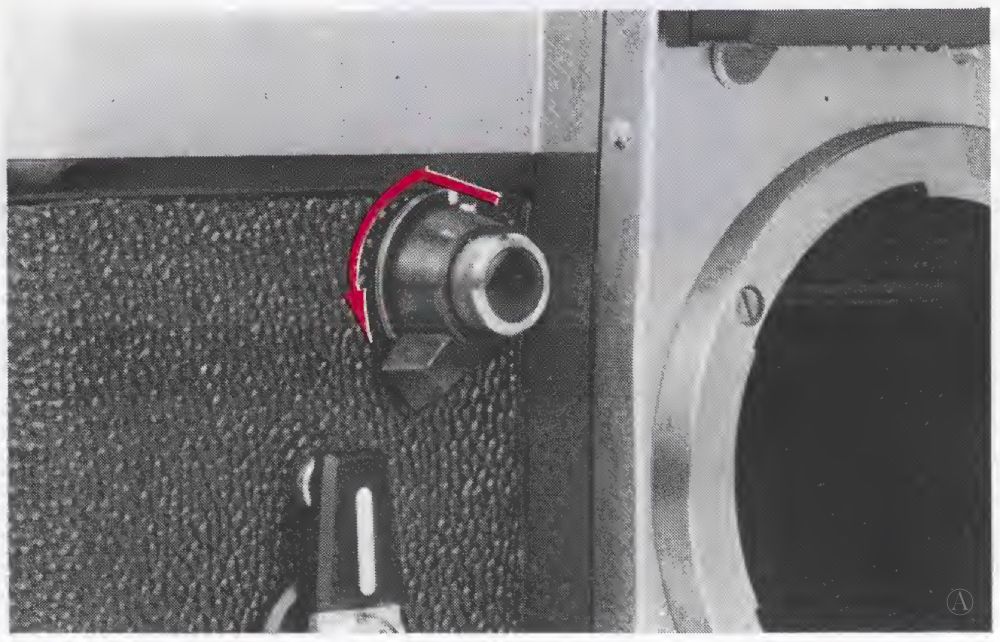
The Variable Long Exposure: The large lever on the front of the camera acts as a traditional 2-10 second self-timer. However, it possesses a secondary genius function. If you set the shutter speed dial to ‘B’ (Bulb) and lift the collar around the shutter button to ‘T’ (Time), the self-timer mechanism acts as a mechanical slow-shutter speed controller. You can dial in exact exposures between 2 and 10 seconds, listening to the glorious whir of the clockwork unwinding before the shutter automatically closes.
Multiple Exposures: Intentional multiple exposures can be made with the Nikon F2 Photomic as follows: after making the first exposure, depress the rewind button on the baseplate and stroke the film-advance lever. This winds the shutter and cocks the mirror for the second exposure without advancing the film. Repeat the procedure as many times as you wish. Exposures may be made at different shutter speeds. The frame counter remains unchanged during this operation.
When the above procedure is followed, the film may move slightly when the film-advance lever is wound. To avoid this, depress the rewind button and hold it down while you stroke the lever and make the exposure. Repeat this procedure as many times as desired. After the last exposure, stroke the film-advance lever once more. This time do not hold the rewind button down. The rewind button will pop out to indicate the film-advance mechanism being re-engaged. Then cover the lens with a lens cap and press the shutter release button to open the shutter. Now, advance the film to the next frame.
The Nuance of Flash Synchronization
If you look closely at the top of an F2 prism, you will notice a glaring omission: there is no standard hot shoe.
Instead of cluttering the removable prisms, Nikon placed a proprietary flash contact over the rewind crank on the left side of the body. To use a modern flash, you must slide an adapter (specifically the Nikon AS-1 flash coupler) over the rewind knob. This converts the proprietary connection into a standard ISO hot shoe.
Once your flash is mounted, you must set the shutter speed dial to the marked 1/80th of a second (often indicated by a red line or red ‘X’ between the 60 and 125 marks). Because the titanium shutter curtains travel horizontally across the focal plane, 1/80s is the maximum speed where the curtains are fully open at the exact moment the flash fires. Shoot any faster, and the second curtain will begin to close before the flash burst, resulting in a partially black frame. Alternatively, you can bypass the hot shoe entirely and plug a standard sync cable directly into the PC terminal located on the front left of the camera body.
Batteries
Although operational without batteries, the Nikon F2 takes two 1.55V Silver Oxide button cells for its meter. The standard batteries are commonly designated as SR44, 357 or 303 and are installed under a coin slot cover on the base. Many people make the mistake of using cheaper 1.5V LR44 alkaline batteries. Don’t do that, their voltage steadily drops and causes the F2’s light meter to give increasingly inaccurate readings as the batteries deplete.
The best option is to upgrade and swap the two button cells for a single 3V 1/3N lithium battery. These batteries deliver a consistent 3V and ensure accurate readings. Though note that lithium cells drop off rapidly so pack a spare.
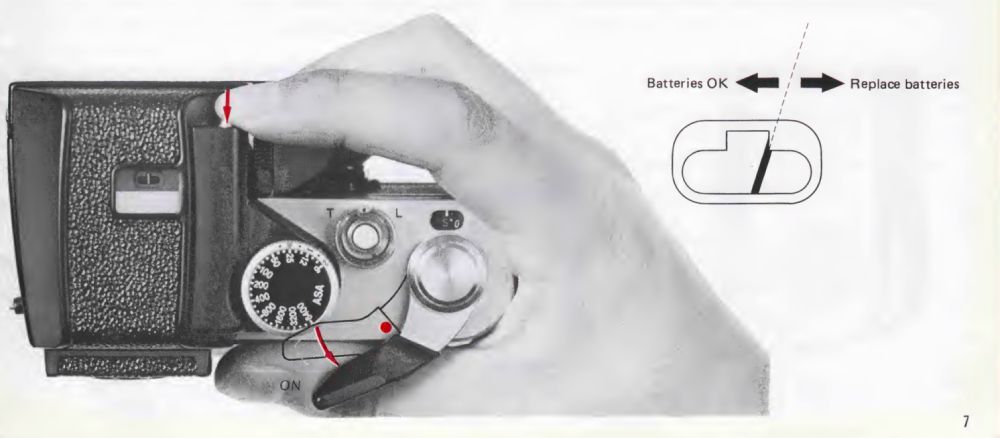
The F2 has a battery level check button on the front side of the viewfinder prism.
The Analogue Takeaway
If you have shot with other fully manual cameras, using the F2 will come naturally. However what stands out is how much it feels like a pleasure to use over the entry level offerings. Pros chose Nikon, when you use the F2 you can feel why. The lens support is great, the meters work well, the cameras are reliable and aesthetically look great in my eyes.
Everything feels brilliantly analogue, and that’s what we are here to celebrate.
The original Nikon manual can be found here: Nikon F2 Manual.